Top Links
Journal of Materials Science and Nanotechnology
ISSN: 2348-9812
Effect of Re-Aging on Strength, Corrosion and Dry Sliding Wear Behavior of 7075 Aluminum Alloy
Copyright: © 2016 Neeraj Kumar. This is an open-access article distributed under the terms of the Creative Commons Attribution License, which permits unrestricted use, distribution, and reproduction in any medium, provided the original author and source are credited.
Related article at Pubmed, Google Scholar
The effect of re-ageing on hardness, pin-on-disc sliding wear and corrosive behavior of 7075 aluminum alloy is studied. The as cast alloy was solution treated at 470 °C for 2hrs and aged at 120 °C for 6 and 24hrs respectively. Wear tests were conducted on a pin-on-disc- wear testing machine with die steel rotating disc. Corrosion tests were carried out in 3.5% aqueous solution. Ageing at 120 °C for 6hrs improved the wear resistance on increasing speed from 100 - 400 m/sec at a constant load of 5N. The Ageing at 120 °C for 24hrs enhanced the wear property on increasing load from 5 - 15N at constant speed 100 m/sec. Ageing for 24hrs exhibited higher corrosion resistance than the alloy aged for 6hrs and the original alloy. With the help of optical and scanning electron microscopic analysis, the mechanism of wear and corrosion has been predicted. The study may help in developing improved property of the heat-treatable aluminum alloys.
Keywords: Aluminum Alloy 7075; Re-ageing; Corrosion; Dry Sliding Wear
The heat-treatable Al alloys are increasingly being used in the application of aircraft and automobile materials particularly for its low weight/strength ratio resulting in lower fuel consumption. However, further development is needed with respect to improving the specific strength, corrosion and wear properties for a more versatile application. The 7075 alloy is ideally suitable for age hardening as indicated by the Al-Zn phase diagram. This phase diagram represents the solid solubility of zinc increases with increases temperature and eutectic point occurs at temperature 381 °C. The solid solution of zinc produced number of GP zones during the ageing and gives rise to an intermediate phase which is nearly equal to the aluminum matrix. The sequence of phases observed during aging depends on the time, temperature and quenching rate. At temperatures above 150 °C, coherent or incoherent precipitates start to form. The formation of a number of precipitates is affected by the presence of Zn content. The aluminum–zinc phase diagram is shown in Figure 1.
This group of alloys is also supposed to offer better corrosion resistance due to the proximity of Al and Zn in the galvanic series (Table 1). Literature reveals that 7075 aluminum alloys, after aging, exhibit good hardness, tensile strength, and corrosion resistance [2-5]. Methods to increase this strength, corrosion and other properties like wear of aluminum alloys have been studied [6,7]. These properties may be enhanced by precipitation hardening which has been explained through a systematic sequence: supersaturated solid solution → GP zones → η’phase (Semi –Coherent intermediate) → η phase (Incoherent stable). The GP zones are created during a natural or artificial ageing, which serves as nucleation sites for the formation of metastable ń phase. This has been observed that the incoherent stable phase η is responsible for the peak hardening of 7075 alloys and propagates to local corrosion attack [8,9]. Literature shows that the corrosion resistance is greatly affected by the aging treatment [10]. A few papers have been devoted to the mechanical strength and corrosion résistance by dual-retrogression and re-aging treatment [11]. C.M. Abreu shows that corrosion resistance and tribological properties achieved after nitrogen ion implantation into aluminum alloy AA7075 subjected to two different tempering [12]. However, Retrogression re-aging - treated alloys exhibited higher corrosive and wear rate than original alloys [13]. In this Investigation, 7075 aluminum alloys are taken for studying the strength, corrosion and wear behavior.
A cylindrical rod of Aluminum 7075 of 9 cm diameter and 32 cm length was prepared in the laboratory and used for the study. The heat treatment of aluminum alloys started with the solution treatment at 470 °C followed by water quenching and age hardening at 120 °C for 6 and 24hrs respectively. The samples were designated as 7075, 7075 - 6hrs and 7075 - 24hrs. The samples were again heated at 180 °C for 20 minutes and then cooling to room temperature. The samples again re-aging at 120 °C for 6 and 24hrs were passed out for precipitation of alloying elements. The hardness of three samples was measured and the samples with high strength were considered for further testing the wear and corrosion property (Figure 2).
(a) Optical Microscopy
The samples are belt grinding to obtain the flat surface and then polished with fine SiC paper (grit size 180, 400, 600, and 1000) to get a mirror image. After polishing, the following etchant is used and are then washed, dried and seen under optical microscope (Table 2).
The microstructure of samples as in cast state consists of α(Al) and Eutectic phase (Figure 3(a)). The α(Al) matrix in a light colour and eutectic phase in black color at the grain boundaries. Whereas Figure 3(b) shows the α(Al) matrix consists of second phase elements as a precipitate is homogeneously distributed during the solution treatment.The ageing at 120 °C for 6hrs Figure 3(c) forecast the growth of precipitates are formed by non-coherent η-phase and coherent η’-phase located at interior and along the grain boundary. When the age hardened time is increased, non-coherent phase tends to transfer into coherent which is shown in Figure 3(d) [14]. This could be a reason for the decreasing in hardness with respect to aging time for 24hrs.
The surface was examined by using the scanning electron microscope at a magnification of 200X. Figure 4(a) to (d) show the microstructures of the samples in as-cast, solution treatment, aged for 6hrs and aged for 24hrs condition respectively. The microstructure of as-cast sample Figure 4(a) shows microsegregation of MgZn2 in the aluminum matrix while as solution treatment sample Figure 4(b) shows uniformly dissolution of a main alloying elements such as Zn and Mg and formation of homogeneous phase in the aluminum at 470 °C for 2hrs. The microstructure of aged at 120 °C for 6hrs Figure 4(c) predicts the growth of metastable (MgZn2) phases. The ageing at 120 °C for 24hrs Figure 4(d) shows the formation of the number of GP Zones and metastable precipitates in the alloy matrix [15].
When a metal is dipped in corrosive liquid, the anodic and cathodic reactions occur on the surface. Generally, the metal tendency to release electrons means it oxidizes while the electrolyte liquid is reduced. The metal gets a Corrosion Potential (relative to a reference electrode) which is known as Ecorr. The metal at Ecorr has both anodic and cathodic currents present on its surface, However, these currents are exactly equal in magnitude i.e. the rate of oxidation must equal to the rate of reduction [16]. According to Faraday’s law, there is a linear relationship between metal oxidation rate or corrosion rate and corrosion current Icorr. This corrosion current and corrosion density can be calculated by the bultler –volumer equation The overvoltage (η) is the difference between applied potential and the corrosion potential Ecorr.The corrosion currents and tafel constants ba & bc can be measured from the tafel slope. If the metal is polarized more than Ecorr, the anodic currents predominant (η/ba >>1) at the expense of the cathodic currents (η/ba <<-1), both the reactions are simplified by volume equation.
Chemical and electrochemical Cell: The corrosion test is performed in 3.5% aqueous sodium chloride (NaCl, Merck, 99%), is prepared by dissolving 35g of NaCl in 1 Liter glass flask at room temperature (25 °C). According to ASTM standard (G26), a polarization cell is a setup consisting of the electrolyte solution, a reference electrode (Saturated Calomel), a counter electrode (SS316) and the metal sample of interest connected to a holder which is known as working electrode. The diameter of the working electrode is 16mm with a total exposed surface area of 0.785cm2. The electrodes are connected to an electronic instrument called a potentiostat (PGSTAT203N AUTOLAB) which is shown in Figure 5. The three electrodes used to place in the solution, a potential is applied between working electrodes and a reference electrode. The current is measured by the potentiostat between the working electrode and the counter electrode. The potential has been recorded from -842.440 mV to -741.270 mV at sweep rate 10 mV/S.
The tested metal acts as working electrode (WE) which is placed in the corrosion cell and connected with Counter electrode (CE) and a Reference electrode (RE) (Figure 6). In this case, the current flows between the CE and WE. The potential difference is controlled between the WE and CE, the potential difference between RE and WE is controlled at all the time. The potential between the WE and CE usually is not measured. This configuration allows the potential across the electrochemical interface at the WE to be controlled with respect to RE [17]. The logarithm current is plotted versus applied potential to obtain the tafel plots. The Ecorr, Icorr and tafel slopes are determined from the plots of potentiodynamic measurement machine. The Values of Rp and CR are determined from following equations
The Ecorr, ba, Icorr and tafel slops have found out from the tafel plots of potentiostat technique. The values of Rp and CR have calculated from the equation (1) and (2). The values Ecorr, ba, Icorr, Rp and CR for 7075, 7075 - 6hrs and 7075 - 24hrs are shown in the above Table. The polarization curves have obtained from experiment results for aluminium alloys in the 3.5% aqueous NaCl solution are shown in the Figure 7. They showing a quite significant difference in results Such as the 7075 - 24hrs and 7075 - 6hrs showing lower corrosion rate from 0.18 mm/yr to 0.31 mm/yr than the 7075. Whereas for the rest of materials like corrosion rate of 7075 take place in the range of 0.43 mm/yr. In the case of the 7075 - 6hrs, the corrosion rate are found lower than the 7075 - 24hrs (Figure 7). The overall results revealed the corrosion potential for the 7075 – 24hrs have shifted towards positive potential value which reflects good resistance to corrosion in the solution of sodium chloride. The high corrosion resistance could be possible to the formation of a large number of the fine precipitate with high density on the grain boundary.
The Figure 8 shows that the Vicker Hardness (VH) of sample 7075 obtains lower value than the aged sample and the sample 7075 - 6hrs is achieved an appreciable value of hardness due to rapidly diffusion or precipitate hardening. The significant peak of this curve is obtained the maximum value of hardness. It means that the increasing value of hardness is due to the formation of appropriate numbers of metastable (MgZn2) phases and the second possibility of diminishing of hardness for the 7075 - 24hrs sample (at longer ageing) is due to the gradual transformation of metastable phases to stable phases in the matrix of aluminum alloy [18].
The pin-on-disk machine (Model TR 20 LE, DUCOM) are used for the characterization of heat treated samples such as 7075, 7075 - 6hrs and 7075 - 24hrs under a dry sliding condition which are shown in Figure 9. A dry sliding pin-on-disk test of ASTM G99 is employed to investigate the wear behavior of aged samples. The aged samples work as a stationary pin, on the die steel rotating disk with RC65 hardness. All the samples are worn in a fixed track diameter of 50mm and sliding speed. The wear rate in microns is calculated on the rotating disk for different applied loads of 5N, 10N, and 15N at sliding speed 100 rpm. The data of friction of Coefficient and wear has continuously been watching and recorded by software winducom2010 in the set slot.
Results show that as the speed increases on the respective heat treated samples it has observed that the precipitated heat treated aluminum alloy for 6hrs have higher wear resistance than the rest of samples (7075, 7075 - 24hrs). The important in the wear resistance of precipitated treated alloys produced fine precipitate dispersion which is linked with a good solubility of alloying constituents during the process. It also found that the wear resistance to high aging period fluctuates with respect increasing the speed at a constant load of 5N. On increasing the speed at 400 rpm, the coefficient of friction decreases due to the reduction of the frictional force between two different materials.
In the case of Figure 10(c) and (d), the 7075 – 24hrs sample shows that though wear rate is lower at higher force pressing since the adhesion is weaker under higher load. This is further confirmed that the sample aged for 2hrs is a favorable condition under increasing load i.e. higher load on 7075 - 24hrs is the optimum value, enhanced the wear properties at constant speed 100 m/sec. Hence, the reason behind increasing wear resistance of aged for 6hrs could be the possibility of uniform growth of metastable (MgZn2) phases in aluminum which act as obstacles during sliding.
In the present study, the effect of re-aging on the strength, corrosion and wear properties of 7075 Al alloy has been studied
1. The Hardness of 7075 - 6hrs shows the highest peak as compared to 7074 - 24hrs aluminum alloy.
2. The optical microscope shows the globular shape of precipitates uniformly distributes on the surface which helps to strengthen and good wear resistance.
3. Corrosion test of aged sample in 3.5% aqueous NaCl shows that 7075 - 24hrs exhibited highest resistance to corrosion than 7075 - 6hrs.
4. The SEM analysis predicts the growth of metastable phase in the matrix of aluminum alloy.
5. Pin-on-disc wear characteristics established that wear resistance of 7075 - 6hrs increases as compared to both of them at a constant load of 5N.
6. The 7075 - 24hrs sample shows that though wear rate is lower at higher force pressing since the adhesion is weaker under higher load.
The author thanks, Prof. Sudip Kumar Sinha, NIT Raipur for his moral support and very much thankful Shri Rameshwar Khandelwal, CEO, Tirumala Bala Ji Alloys for his valuable discussion. The authors would like to thanks, Mr. Kaushal Kishor Ray and Mr. Yallapu Santosh Kumar, OP Jindal University, Raigarh for technical support in foundry laboratory.
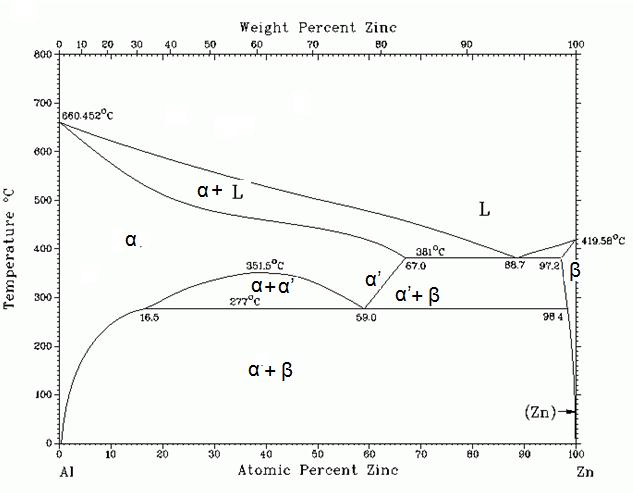 |
| Figure 1: Phase diagram of Al-Zn system [1] |
| Figure 2: Spectrum Analysis of alloying elements by EDX |
Figure 3: Optical Micrographs: (a) 7075 aluminium alloy: as in cast state (b) Solutionized 7075 AA at 470 °C for 2hrs (c) Aged 7075 AA at 120 °C for 6hrs (d) Aged 7075 AA at 120 °C for 24 h. |
Figure 4: Scaning electron Micrograph: (a) 7075 aluminium alloy: as in cast state (b) Solutionized 7075 AA at 470 °C for 2hrs (c) Aged 7075 AA at 120 °C for 6hrs (d) Aged 7075 AA at 120 °C for 24hrs. |
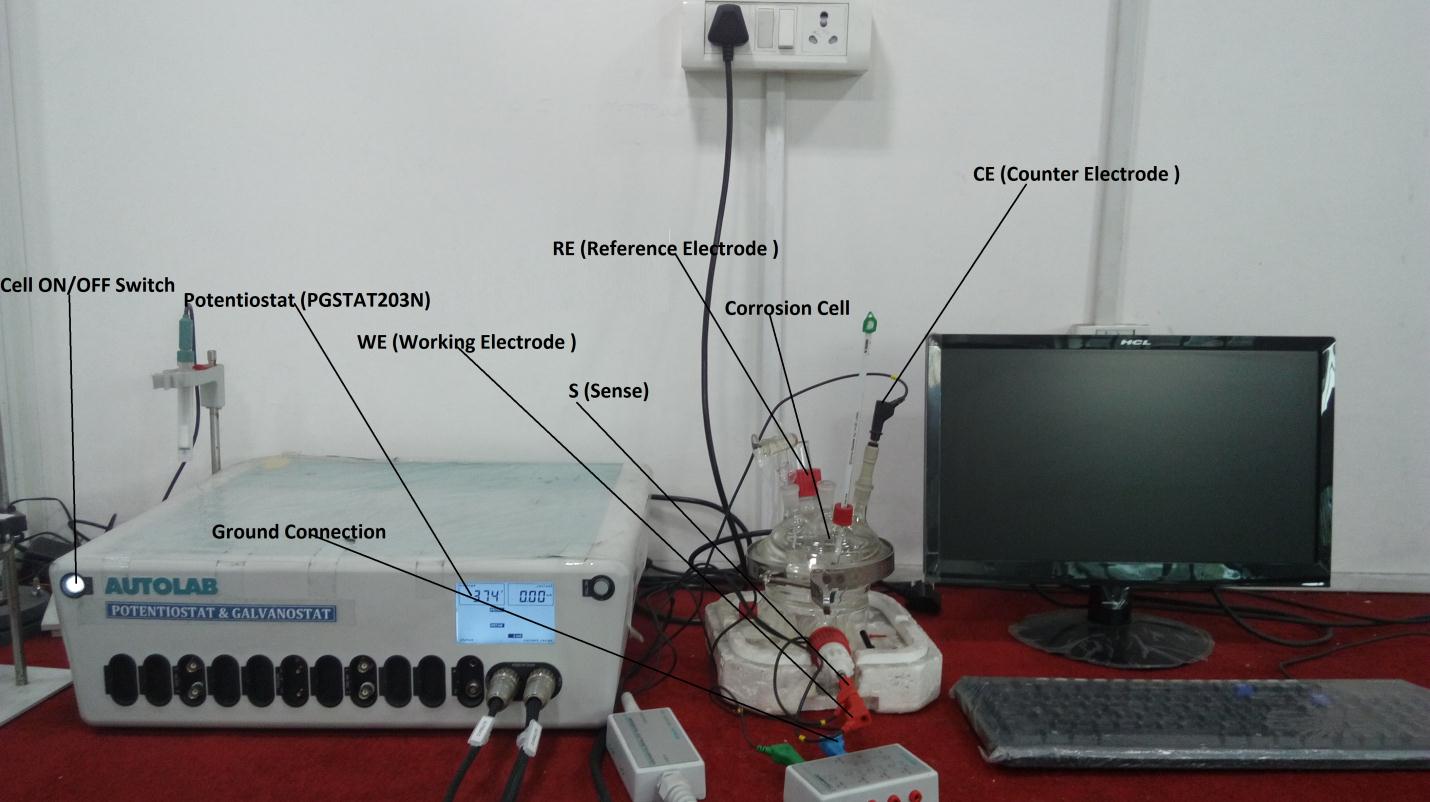 |
| Figure 5: The Corrosion testing machine with integrated system |
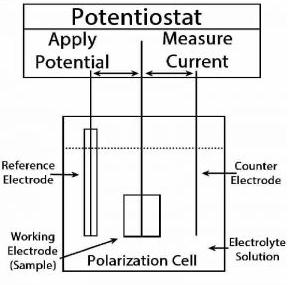 |
| Figure 6: The Corrosion Cell |
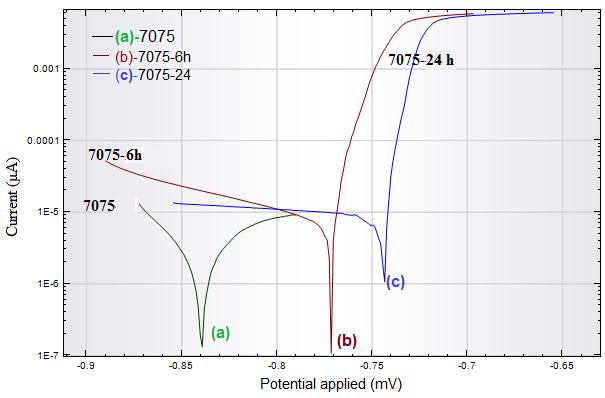 |
Figure 7: Tafel Plots for: (a) 7075 aluminium alloy (b) Solution treated 7075 AA at 470 °C for 2hrs (c) Aged 7075 AA at 120 °C for 6hrs (d) Aged 7075 AA at 120 °C for 24hrs immeresed in 3.5% aqueous NaCl solution |
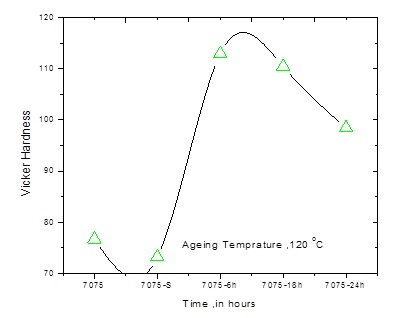 |
| Figure 8: Hardness is the function of Time (hours) |
 |
| Figure 9: The Experimental unit of Pin-on-disc sliding wear Testing machine |
| Figure: 10 Wear Plots for: (a) Wear is the function of increasing speed at constant load (5N) (b) Coefficient of friction Vs Speed at constant load (5N) (c) Wear is the function of different applied loads of 5N,10N &15N at speed 100 m/sec (d) COF is the function of different applied loads of 5N,10N &15N at speed 100 m/sec |
Zn |
Mg |
Cu |
Cr |
Al |
5.96 |
2.48 |
1.59 |
0.21 |
Bal. |
| Table 1: Chemical Composition of as a Cast Sample | ||||
Etchant |
Bath Composition |
Condition |
HF etch |
1mL HF (48%),200 mL H2O |
Swab at 27 °C for 25 Sec. |
| Table 2: Composition and operation condition of etchant for 7075 AA | ||
Sample ID |
Ecorr, SCE (mV) |
ba (mV /dec) |
Icorr (µA) |
Rp ( ᾨ ) |
CR (mm/yr) |
7075 |
-839.67 |
31.65 |
1.934 X e-7 |
327.16 |
0.43 |
7075-6h |
-771.53 |
21.02 |
2.304 X e-6 |
402.06 |
0.31 |
7075-24h |
-743.79 |
15.63 |
1.916 X e-6 |
528.59 |
0.18 |
Table 3: Ecorr, ba, Icorr, Rp and CR values obtained from Tafel plots for 7075, 7075 - 6hrs and 7075 - 24hrs in 3.5% NaCl |
|||||


